Losing files stings. Whether it’s a work presentation you stayed up late perfecting or family photos you never backed up anywhere else, nobody wants to feel the panic of missing files. Can I recover permanently deleted files? How to recover missing files easily?
Data recovery means the process of recovering inaccessible, lost, or corrupted data from storage devices like hard drives, SSDs, USB flash drives, and memory cards.
Fortunately, most missing or deleted files don’t go forever. They exist on the storage medium until new data overwrites them. That’s why acting quickly matters more than anything else.
Now, let’s walk through what causes data loss and how to get everything back.
Why Are Your Files Getting Lost?
Data doesn’t just disappear into thin air. Several common culprits are usually responsible for that:
- Accidental deletion — It happens to the best of us. You select a folder, hit Delete, and realize seconds later you grabbed the wrong one. The Recycle Bin catches some of these, but Shift+Delete bypasses it entirely, sending files straight to digital limbo.
- Drive failure — Mechanical hard drives have spinning platters and moving read heads that wear down over time. A sudden click or grinding noise often signals impending failure, making hard drive recovery a genuine race against the clock.
- File system corruption — Power outages, improper ejections, or malware can corrupt the file system, leaving your drive in a RAW state where Windows simply refuses to read it.
- Formatting mistakes — Ever reformatted the wrong partition during an OS reinstall? It wipes the file table in an instant, though the underlying data often survives until something else writes over it.
The moment you notice files are missing, stop using the affected drive immediately. Every new write reduces your chances of successful file recovery.
Best Windows Data Recovery Tool — MyRecover
When you need to recover deleted files without pulling your hair out, having capable software makes all the difference. MyRecover stands out as a reliable Windows data recovery software that tackles everything from simple accidental deletes to complex drive failures — no IT degree required.
Here’s what makes MyRecover worth your time:
- Supports 1,000+ file types — JPEG, MP4, PDF, DOCX, XLSX, and many more. Whatever you lost, there’s a strong chance it’s covered.
- Works with all major storage (500+) — Internal HDDs, SSDs, USB drives, SD cards, and external hard disks. If Windows recognizes the drive, MyRecover can scan it.
- Two scan modes — Quick Scan pulls up recently deleted files in seconds, while Deep Scan digs through every sector for harder-to-find data, like files on a formatted hard drive, corrupted SD card, etc.
- Preview before recovery — Look at photos, documents, and videos before committing. No guessing, no wasted effort.
- Free recovery up to 500 MB — Test the waters without spending a cent. Upgrade only when you need more capacity.
- Broad Windows compatibility — Runs smoothly on Windows 11, 10, 8.1, 8, 7, Vista, XP, and all Windows Servers without hiccups.
For anyone weighing professional data recovery services against a DIY approach, MyRecover often bridges that gap — delivering impressive results at a fraction of what a cleanroom lab would charge.
How to Recover Data with MyRecover in 4 Steps
Important:
- Before starting, connect the external storage device to your computer.
- If you’re dealing with a failing internal drive, install MyRecover on a different working PC and attach the problematic drive there.
- For drives that won’t show up at all, this guide on recovering data from an external hard disk that’s not detecting walks you through the troubleshooting process.
1. Download and install. Grab MyRecover from the official website and install it on your Windows computer. If the lost files lived on an external drive or SD card, connect that now.
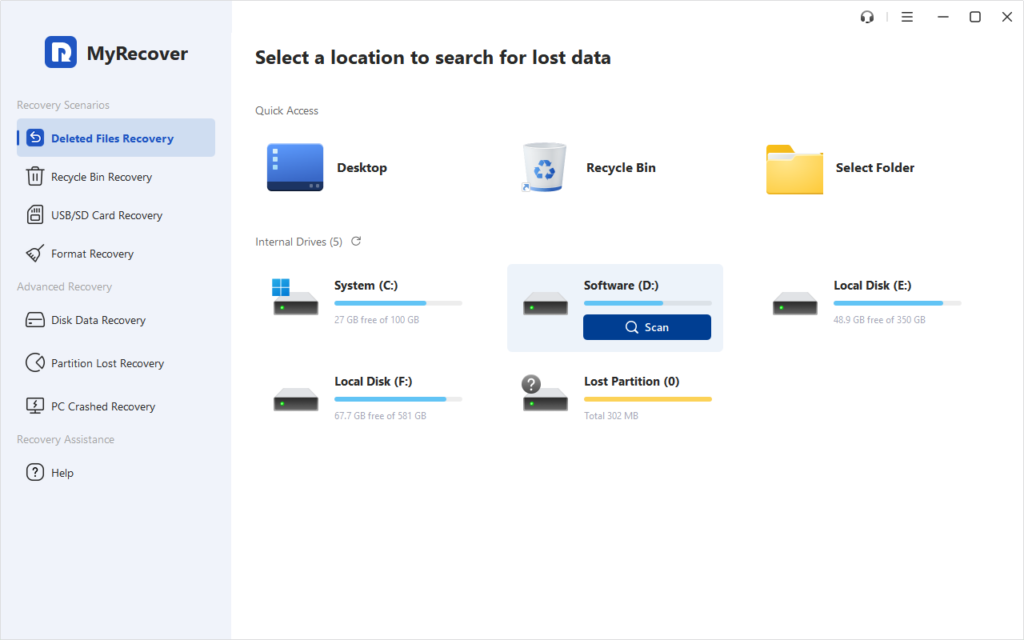
2. Launch and scan. Open MyRecover, choose Deleted Files Recovery or other features that suits you best, hover over the target drive or partition, and click the Scan button. The Quick Scan runs first, surfacing recently deleted items in a matter of seconds.
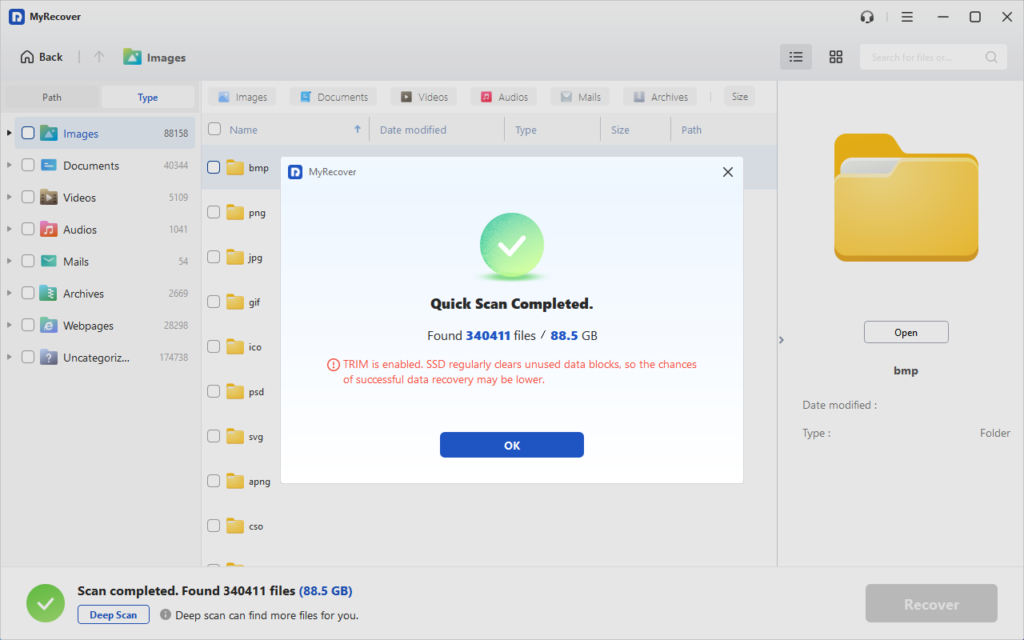
3. Select files. Browse the results, filter by file type (images, documents, videos, etc.) and file path, or use the search bar to locate specific filenames. Preview any file to confirm it’s what you need, then check the boxes next to your selections.
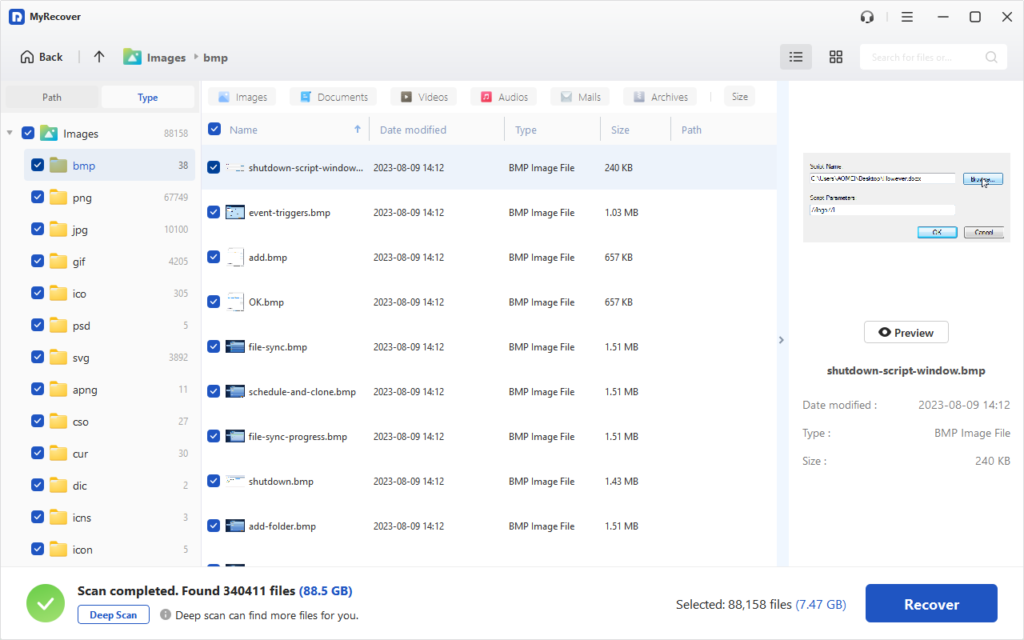
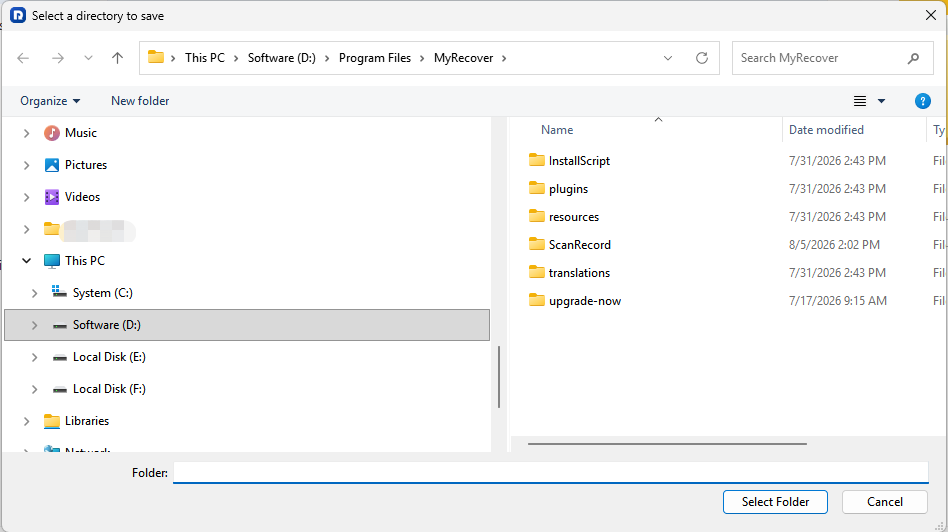
4. Recover and save. Click the Recover button, pick a destination folder on a different drive than the source, and let the software handle the rest. Saving to the same drive risks overwriting data you haven’t yet recovered.
Tips:
- If the Quick Scan comes up short, switch to Deep Scan for a thorough sector-by-sector search. This mode proves especially useful for hard drive data recovery after formatting or file system corruption.
- You can also narrow down thousands of results using built-in filters — sort by date, size, or type to zero in on what matters.
- Handling large-scale tasks or multiple drives? Upgrading to MyRecover Professional unlocks unlimited recovery capacity and priority support.
Conclusion
Data loss feels catastrophic in the moment, but it’s rarely the end of the story. Whether you’re dealing with accidental deletes, a corrupted file system, or a drive that won’t cooperate, a solid recovery tool can pull your files back from the brink.
MyRecover makes the process straightforward with its clean interface, broad file type support, and powerful scanning engine. For more specific scenarios, this walkthrough on recovering permanently deleted files covers additional methods. Don’t wait around — the sooner you act, the better your odds.